Once in a while you should update and upgrade your brew formulae. And don’t forget to clean up afterwards.
Also, be advised that “brew cleanup” will need a “–all” in the near future.
Once in a while you should update and upgrade your brew formulae. And don’t forget to clean up afterwards.
Also, be advised that “brew cleanup” will need a “–all” in the near future.
TotalTerminal (by the makers of TotalFinder) adds a global shortcut for your Terminal to Mac OS X. If you’re working a lot with the Terminal, this just might be a really helpful tool.
 With OpenZFS on OSX, OpenZFS is finally available on the Mac platform. That is great news because now, BSD, Linux and OS X are on the same page on the topic os ZFS.
But please be careful on what you’re trying to mount. For example, ZFS pools from FreeNAS 9.2.1 (and newer) can’t be mounted as OpenZFS does not yet support the hole_birth feature (FreeNAS uses pool version 5000 while OpenZFS uses pool version 28).
So pay attention on whether or not you want to upgrade your FreeNAS. I stated it before: if you want to use FreeNAS in production, I recommend FreeNAS 9.1.1. FreeNAS 9.2.0 should work with OpenZFS, too.
If you created your pool before FreeNAS 9.2.1, you should be fine anyway. FreeNAS does not upgrade your pool automatically. You have to do it by using zpool upgrade <pool name> via the command line.

I know it’s widely recognized, but I just have to mention it here as I just installed it once again: Brew.
To explain it shortly, Brew is a very nice, comprehensive and easy to use package manager for Mac OS X.
All those unix tools you want but aren’t available on Mac OS X out of the box are available with Brew, like wget, mtr, tmux, etc.
Have a look at the homepage, the list of packages and maybe the Wiki.
 A good (S)FTP client is crucial for anyone who’s working online a lot. On Windows, I’m using good ‘ol FileZilla. On Mac OS X, I was a Transmit fanboy for quite a while (also, Panic makes a lot of great software).
But today, I found Flow. Clean interface, fast, efficient (>50MB RAM usage!), and cheap (4,49€ in the Mac App Store), it’s a great deal. Definitely a recommendation for anyone who’s looking for a new FTP client.
As already said, Flow features a very clean interface and it’s totally integrated into Mac OS X. It has a built-in editor, but you can also choose one of your choice (if you’re using Coda, Sublime Text or Chocolate for example).
It also features Quick Look integration, a feature I really like in a FTP client. Using that, I can look for files without having to download or open them locally – it’ll all been handled by the client (Transmit does that too).
Head over into the Mac App Store for some screenshots, right now I don’t have any machine where I could show you the contents.
Five years and 11 Months ago I started using Mac OS X when I bought my first MacBook.

About one year ago it started to show signs of the age and the heavy usage and in the last couple of months I thought two times that it had gone. But it lived on, right until a few days ago, when the logicboard failed and it shut off, never to awake again. It did serve me very well.
The replacement will hopefully ship next week. It’s a 13″ MacBook Pro Retina and I’m very excited about it!
Word for Mac 2011 caused up to 60% of CPU load even when just idling. Very annoying, not only because it caused my computer to constantly ventilate, but it also brought down the battery life.
A quick Google search found that this is caused by the grammar checking. Deactivating the grammar check as described here (turning off “Check grammar as you type” is sufficient) should do the trick. Yay!
Please excuse that I only have a german version of Word installed, but here’s a screenshot anyway:

Recently, I reactivated an old Asus notebook to use as a NAS. The main point is to benefit from wireless Time Machine backups.
Since it is widely praised I chose FreeNAS for that machine but unfortunately it is not very good documented how to actually get your FreeNAS image on a thumbdrive when you’re running Mac OS X. Most How-Tos require to load the .img file which isn’t available anymore for the most recent versions. So, here we go:
1. Preparations
What do you need?
– A thumbdrive. I use a 4GB drive
– The FreeNAS image file, x86 or x64, depending on architecture.
– Keka, an open source unarchiver (please see the EDIT under 2.).
2. Getting the correct image file
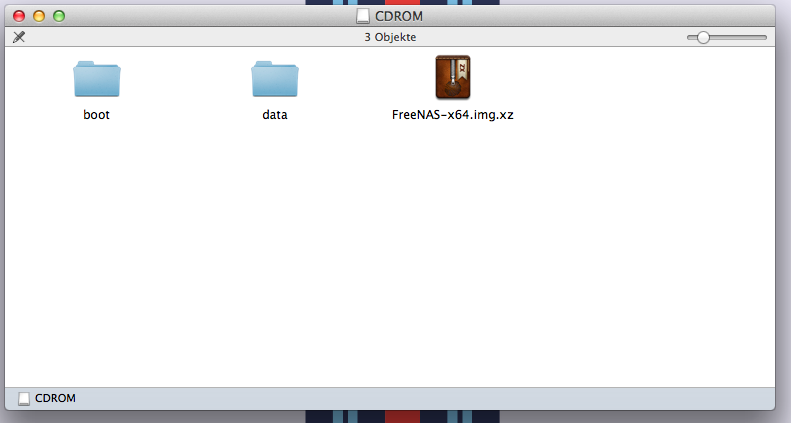 The FreeNAS .iso file is meant to be used with a CD or DVD so it doesn’t work out of the box on a thumbdrive. However, it includes the correct image, a file named FreeNAS-x64.img.xz (or FreeNAS-x86.img.xz). Keka is one of the few free Mac tools that can unpack .xz files. Unpack it and you will get a 2GB .img file. Store it somewhere you’ll find it later.
EDIT: I tool the liberty and uploaded an already unpacked FreeNAS-x64.img. Feel free to download it from there so you won’t need keka.
3. Getting the image onto the thumbdrive
Theoretically, you could restore the .img file on the thumbdrive with the Disk Utility, but that approach is flawed. Disk Utility often fails to restore images so we do it the old school way by using Terminal and dd.First, you have to find the path to your drive. To do that, open the Terminal and type
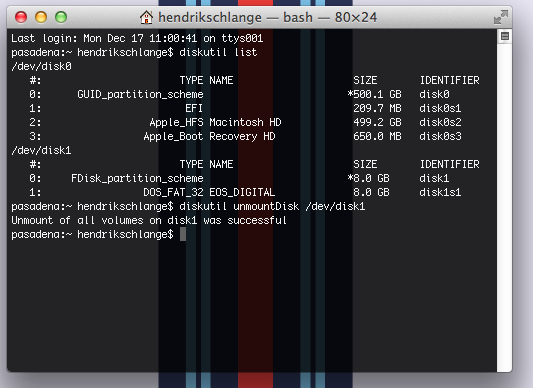
diskutil list
That will give you a list of devices one of which is your USB stick. Note that path, it’ll look something like /dev/disk1. To enable your Mac to partition the drive you’ll have to unmount it. To do so, type
diskutil unmountDisk /dev/yourdrive
The result should look somewhat like this:
 Now you can let your Mac do the magic of transferring the image to the drive.
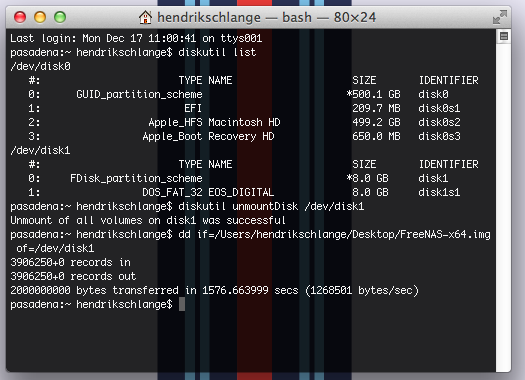
the command for that is dd and should be like this:
dd if=path/to/file of=path/to/drive.
For example:
dd if=/Users/Username/Desktop/FreeNAS-x64.img of=/dev/disk1
That process can take quite a while so be patient. I tried it on a very slow merchandise drive and it took 42 minutes.
The result should look like this:
Your Mac will tell you that it can’t read the drive. That’s totally normal, the Mac can’t read the filesystem on the stick. Just hit ignore or unmount and everything will be alright.
Now you’re done. Plug it into your machine and start having fun with FreeNAS!
EDIT: Running Mac OS X 10.9 Mavericks, I had the problem that the Terminal gave me Permission Denied errors when running the last command. Running dd as sudo fixed that for me. So, if you’re having the same problem, just use a command like this:
sudo dd if=/Users/Username/Desktop/FreeNAS-x64.img of=/dev/disk1
You will have to enter your password to run the command as sudo.
