Recently, I reactivated an old Asus notebook to use as a NAS. The main point is to benefit from wireless Time Machine backups.
Since it is widely praised I chose FreeNAS for that machine but unfortunately it is not very good documented how to actually get your FreeNAS image on a thumbdrive when you’re running Mac OS X. Most How-Tos require to load the .img file which isn’t available anymore for the most recent versions. So, here we go:
1. Preparations
What do you need?
– A thumbdrive. I use a 4GB drive
– The FreeNAS image file, x86 or x64, depending on architecture.
– Keka, an open source unarchiver (please see the EDIT under 2.).
2. Getting the correct image file
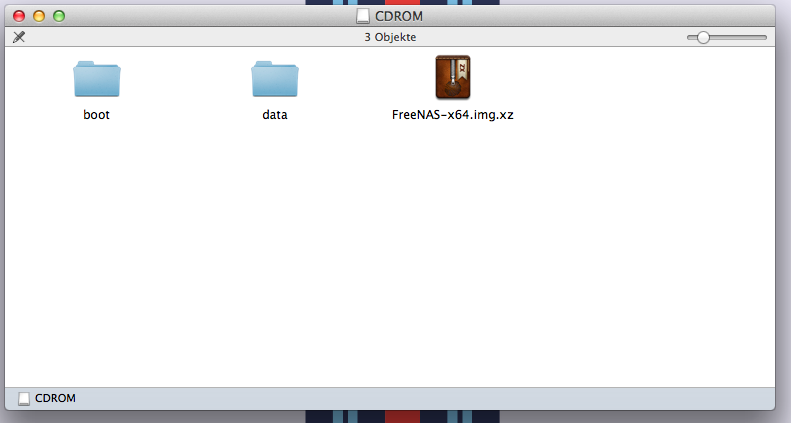 The FreeNAS .iso file is meant to be used with a CD or DVD so it doesn’t work out of the box on a thumbdrive. However, it includes the correct image, a file named FreeNAS-x64.img.xz (or FreeNAS-x86.img.xz). Keka is one of the few free Mac tools that can unpack .xz files. Unpack it and you will get a 2GB .img file. Store it somewhere you’ll find it later.
EDIT: I tool the liberty and uploaded an already unpacked FreeNAS-x64.img. Feel free to download it from there so you won’t need keka.
3. Getting the image onto the thumbdrive
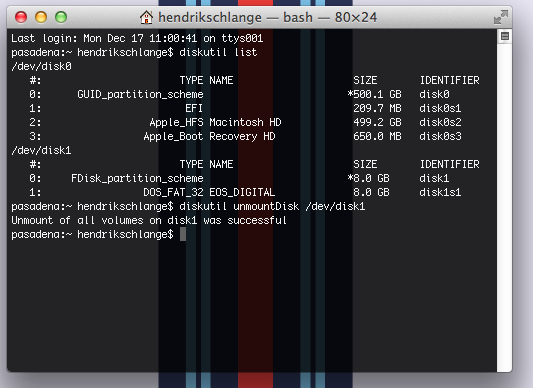
Theoretically, you could restore the .img file on the thumbdrive with the Disk Utility, but that approach is flawed. Disk Utility often fails to restore images so we do it the old school way by using Terminal and dd.First, you have to find the path to your drive. To do that, open the Terminal and type
diskutil list
That will give you a list of devices one of which is your USB stick. Note that path, it’ll look something like /dev/disk1. To enable your Mac to partition the drive you’ll have to unmount it. To do so, type
diskutil unmountDisk /dev/yourdrive
The result should look somewhat like this:
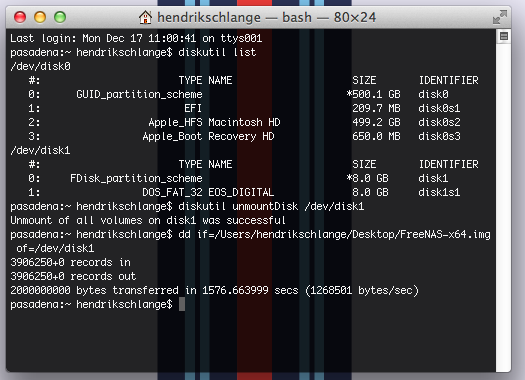
 Now you can let your Mac do the magic of transferring the image to the drive.
the command for that is dd and should be like this:
dd if=path/to/file of=path/to/drive.
For example:
dd if=/Users/Username/Desktop/FreeNAS-x64.img of=/dev/disk1
That process can take quite a while so be patient. I tried it on a very slow merchandise drive and it took 42 minutes.
The result should look like this:
Your Mac will tell you that it can’t read the drive. That’s totally normal, the Mac can’t read the filesystem on the stick. Just hit ignore or unmount and everything will be alright.
Now you’re done. Plug it into your machine and start having fun with FreeNAS!
EDIT: Running Mac OS X 10.9 Mavericks, I had the problem that the Terminal gave me Permission Denied errors when running the last command. Running dd as sudo fixed that for me. So, if you’re having the same problem, just use a command like this:
sudo dd if=/Users/Username/Desktop/FreeNAS-x64.img of=/dev/disk1
You will have to enter your password to run the command as sudo.

Hi Heshsum,
thanks for the nice tutorial.
On your last command you should separate sudo from dd.
It could be confusing for people without Terminal knowledge…
Kind regards,
Kevin
Hi Kevin,
thanks for pointing that out. I changed it in the post accordingly.
Best regards,
Heshsum
This was such a HUGE help for me. I didn’t understand how to get the .IMG file if the only available download was .ISO.
THANK YOU.
Just do ‘xzcat /path/to/filename | dd of=/dev/disk’. No need for Keka.
xzcat isn’t part of a stock Mac OS X installation as far as I know.
Hi! i follow all steps, but my MAC MINI late 2009 doesnt recognize the USB when boot with Option Key pressed.
What can i do to boot from usb ? Is an USB model problem(i tries with 2 models)? Is an DD command problem (i list diskutil list and appears to be fine)?
any help?
I can’t answer this specific question. I never tried to use FreeNAS with a Mac (Mini). But I think that it’s a very good idea. Solid, fast hardware with a small footprint and a reasonable price.
What I can say, is, that you are dealing with an UEFI instead of a BIOS. That means you’d have to have a GPT partitioned USB stick and an UEFI compatible boot file. Maybe this post helps a little: FreeBSD UEFI bootloader concerns, UEFI – FreeBSD Wiki.
The alternative would be to run FreeNAS in a VM, although you’d essentially miss all the distinctive features of FreeNAS.
Hope that helps.
Wich post? (is not linked)
And yes, is a UEFI but his documentation said that freenas since version 8 is prepared for EFI BOOT 😦
Sorry, changed the post. had a minor mistake in the links 😉
The second link is the relevant FreeBSD wiki page which gives info on preparing FreeBSD for UEFI.
i Will try this night, thank you very much !
Please report back if it worked 🙂
Sure ! 😉
Not Worked on my Mac Mini Late 2009 Server 😦
Any way, finally I tries another solution that feel is better. I will use my MAC OS X as NAS, and use 8GB of RAM to create VMachines with all extra services that i need.
Thanks any way!!!
Thanks for the feedback!
Well, maybe as soon as FreeNAS really supports UEFI boot.
I read a bit about this topic and apparently it kinda works if you use Bootcamp to partition the disk and install FreeBSD from a CD instead of a USB Stick (just like Windows).
After that you can boot either Mac OS X or FreeBSD (which will be named Windows in the bootloader).
I guess for FreeNAS it would work too.
If you’re planning on using the Mac Mini as a NAS, this should be very interesting for you: http://openzfsonosx.org/
Currently I changed my idea to:
MacMini with a lot of HDs connected
Use Mac OS X Samba to share it
VMWare fusion with CentOS Virtual Machines for differents services
Use Direct Share Folder (VMWareFusion) with virtual machines
And works like a charm!!
That sounds pretty awesome! Love to read about it 🙂
Have you tried “bs=1m” option to make the block size larger than the default?
It might make copying much faster.
When the block size is smaller than the USB stick’s native bock size, write operation has to mimic the smaller block size. That means it has to read/write multiple times on the stick per every 512 byte. If the USB stick’s block size is 4K, it is 8x (4096/512) slower.
My dd is done in 139 seconds with slow/cheap USB stick.
Thanks for the feedback.
Yes, I’ve experimented with the block size option. I also thought about adding it to the tutorial, but it’s just one more layer of complication (e.g. different drives have different native block sizes). The command has to be adapted by the user accordingly. Therefore, I left it out. But I can still add it 🙂
Btw: the reason for the long transfer time was, that I used an old give away USB drive which writes around 1 MB/s.
I know this stuff, but I do this kind of thing so infrequently that I’m never certain I’m doing it right. Thank you for posting such a clear step-by-step guide, just what I needed!
Nice tutorial! Next to the block size remark (you could use bs=10m without problems on modern flash drives as far as I know), you could also use the raw disk device. For example: if diskutil list gives you /dev/disk6 as your USB thumb drive, using of=/dev/rdisk6 will write to the same device, but much faster!§§§
Hi Rene,
thanks for your comment.
I think the main reason I didn’t cover it, is my lack of good USB drives.
First of all, I did experiment with different block sizes and on most of the devices, a block size of 1m was the best.
Second, I would like to do a bit of explaining about rdisk. The difference between disk and rdisk is caching. disk caches the I/O at 4kb chunks (I think), rdisk just straight up passes the data through to your device. Depending on your device and computer, that does make a lot of difference. In the testing I did, not so much.
I will do a bit of more testing with faster drives and get back to the article. Thank you again for your suggestion!
Heshsum